No Products in the Cart


The essence of the bow tie guy lies in a certain level of independence – maybe even quirkiness and part of his mystique lies in his ability to tie his own bow. Unfortunately, it's not an entirely intuitive task, so if you're still working on it, you may find this page is helpful.
Many consider tying a bow tie an art form, harkening back to an era of elegance, craftsmanship, and personal style. Historically, donning a bow tie has been a sign of sophistication and individuality. In today's fast-paced world, where the bow tie has grown in popularity across all age groups and genders, the ability to tie one's bow tie has become a coveted skill. At Beau Ties of Vermont, we've been crafting high-quality, handmade ties since 1993 with a deep appreciation for this timeless accessory and the personal touch it brings to formalwear.
Understanding how to tie a bow tie is more than just learning a new skill; it's about embracing a tradition of elegance that enhances your personal style. The process may seem daunting for newcomers, but with our step-by-step guide, we aim to demystify it, making bow tie tying accessible and enjoyable for everyone. Whether you're preparing for a special occasion, looking to add a touch of class to your everyday wear, or seeking to impart a sense of tradition in your style, this guide is crafted with you in mind.
Originally worn by Croatian mercenaries in the 17th century as a part of their uniform to hold together the opening of their shirts, the bow tie quickly caught the attention of the French upper class. The French, known for their keen sense of fashion, adopted and transformed it into a fashionable accessory, the cravat, which would eventually evolve into the modern bow tie we know today.
Through the 18th and 19th centuries, the bow tie became a staple of formal wear for men, symbolizing elegance and sophistication. During this time, the bow tie began to take on different shapes and sizes, reflecting personal styles and the fashion trends of the period.
In the latter half of the 20th century, the bow tie experienced a diversification in its usage. No longer confined to black-tie events, it started appearing in casual and business settings, embraced by individuals wanting to express their unique style. This period also saw the introduction of a wide range of materials, including silks, cotton, polyester, and even knitted options, further broadening the appeal of bow ties.
In today’s society, bow ties are not just for men but are worn by women and children, reflecting a sense of fun, sophistication, and non-conformity. Designers have pushed the envelope, incorporating bold patterns, lively colors, and sustainable materials, making the bow tie a versatile accessory suitable for nearly any occasion.
Selecting the perfect bow tie for your outfit extends beyond merely mastering the art of how to tie a bow tie. It involves understanding the balance between personal taste, the occasion, and the attire you’ll be wearing.
First and foremost, the nature of the event you are dressing for plays a crucial role in choosing the right bow tie. For formal occasions, classic colors and materials such as silk in black or deep blue are often preferred. Meanwhile, more casual or festive gatherings open the door to vibrant patterns, unique textures, and playful colors that express individuality and style flair.
Your bow tie should complement, not compete with, the rest of your outfit. If your suit or shirt is patterned, opting for a solid-colored bow tie can add a touch of elegance without overwhelming your ensemble. Conversely, a patterned bow tie can elevate a solid-colored shirt or suit, adding a hint of personality and visual interest.
The material of your bow tie contributes significantly to its overall look and feel. Silk bow ties exude sophistication and are a staple for formal events. However, other materials like wool, linen, and cotton offer a textured contrast that can add depth and character to your outfit, making them excellent choices for less formal occasions.
While how a bow tie looks is vital, how it fits and feels around your neck is just as important. A well-crafted bow tie should sit comfortably against your collar without feeling too tight or too loose. The bow itself should be proportionate to your facial features and body type, ensuring that it enhances rather than detracts from your appearance.
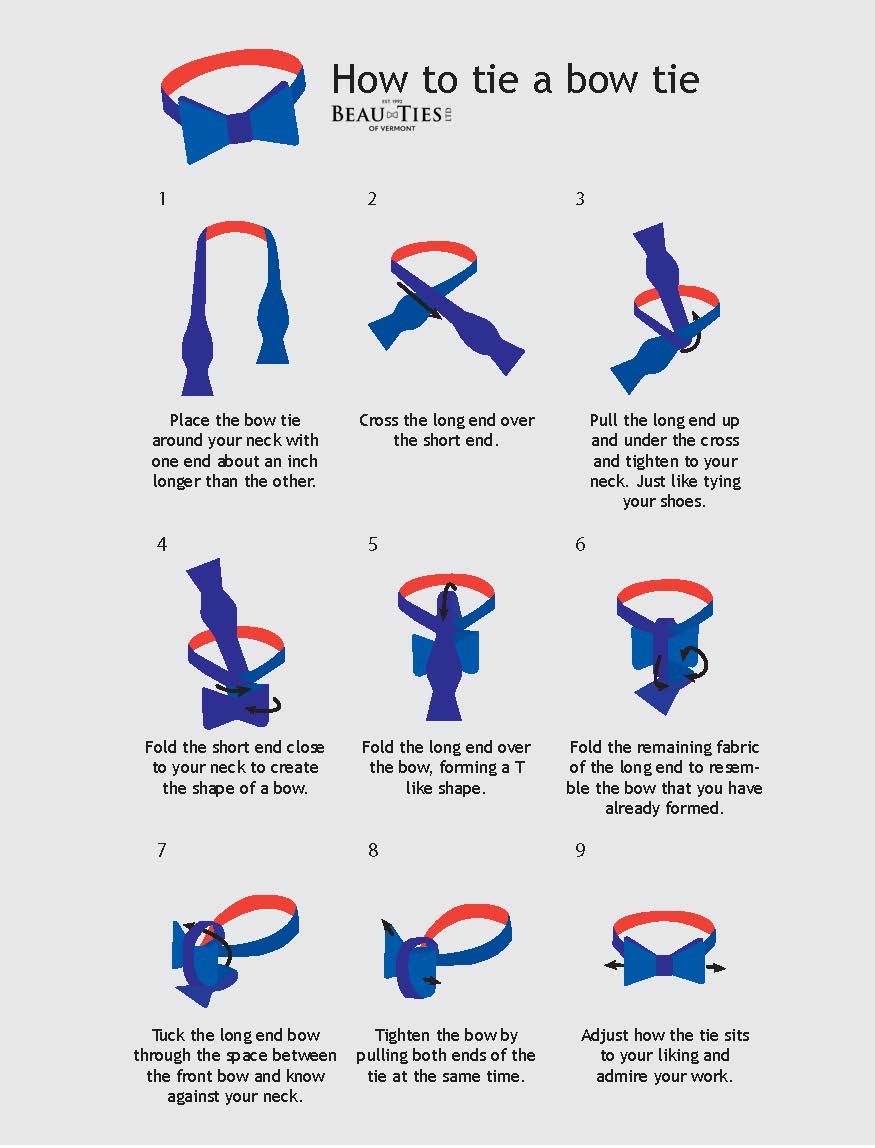
Tying a classic bow tie knot may seem daunting, but it's a skill that adds a significant touch of elegance and personality to your outfit. Let's break down the process into simple, easy-to-follow steps so you'll be tying your Beau Ties of Vermont bow tie with confidence and flair in no time.
Ensure the bow tie is adjusted to your neck size. Place the bow tie around your neck, ensuring one end is approximately 1.5 inches longer than the other. The longer end will be used to create the knot.
Cross the longer end over the shorter end near your neck. This is the beginning of your knot, so keep it snug but not too tight.
Bring the longer end under the shorter one, pulling it up and through the loop around your neck, creating the basic knot. Tighten carefully, ensuring the knot sits comfortably at your collar.
Fold the shorter end horizontally in front of you, forming the bow's shape. Hold this in place with your thumb and index finger.
Drape the longer end over the center of the bow shape you're holding. This step begins to form the classic bow tie look.
Carefully fold the hanging part back towards your neck and pinch it to create a loop. You'll notice a small hole behind the bow you're holding. This is where the magic happens.
Push the pinched part through the hole. This step can be a bit tricky, so take your time. It helps to do this in front of a mirror to ensure accuracy.
Gently pull on both loops and adjust as necessary. You want your bow tie to look even and symmetrical. Adjust the tightness to ensure it’s comfortable but stays in place.
Tidy up! Make sure the flat ends sit behind the loops neatly. A little bit of adjustment might be needed to ensure everything looks great.
Congratulations! You've tied your Beau Ties of Vermont bow tie, which is a testament to your style and our commitment to tradition and quality. Remember, like any skill, perfection comes with practice. The more you tie, the faster and more natural it becomes, allowing your personality and the quality of our handcrafted bow ties to shine through at every event.
When learning how to tie a bow tie, paying attention to the common pitfalls is just as crucial as mastering the steps. Avoiding these mistakes ensures your bow tie looks perfect for any formal or celebratory occasion. Let's delve into some of these common missteps to help you tie your Beau Ties of Vermont bow tie with confidence and elegance.
One of the most common errors when starting to tie a bow tie is not ensuring both ends are of equal length. This discrepancy often leads to a lopsided bow or one that doesn't properly fit around the neck. A good rule of thumb is to keep the end on your dominant side just slightly longer; this minor difference will help accommodate the wrapping process.
When pulling the bow tight, there's a fine line between snug and constricting. Over-tightening can distort the bow's shape and make the tie uncomfortable to wear. Instead, aim for a firm yet gentle pull, ensuring the bow sits comfortably against the collar without skewing its shape.
Attempting to tie a bow tie without first adjusting the shirt collar is a recipe for difficulty. Always pop your collar up before starting to tie. This approach not only gives you more room to work but also prevents the bow tie from getting caught under the collar points.
Many first-timers believe that once the bow is tied, the job is done. However, neglecting the final adjustments can leave you with a bow tie that looks unkempt rather than charming. Spend a moment tweaking the loops and ends, ensuring they are even, and the knot is centered. This step is pivotal in achieving that crisp, symmetrical appearance for which Beau Ties of Vermont is celebrated.
Bow ties come in various sizes, and selecting one that doesn't fit your neck size or body type can hinder your ability to tie it properly. Before you begin, ensure you're working with a bow tie that complements your measurements and suits the occasion.
Tying a bow tie to perfection is as much an art as it is a science. Achieving that enviable symmetry requires patience, practice, and a few insider tips. At Beau Ties of Vermont, we believe in empowering our community with the knowledge to look their best. Here's how you can master the art of tying a bow tie with symmetry that draws admiration
Beau Ties is dedicated to handcrafted excellence. Each tie and accessory offered by our company is meticulously crafted in our Middlebury, Vermont facility by skilled local seamstresses. This level of care and attention to detail ensures that every product meets our high standards of quality, providing you with a tie that not only looks good but also lasts.
Secondly, Beau Ties is deeply rooted in the values of community support and responsible corporate citizenship. We donate 10% of our revenues each month from one curated collection on our website to a different charitable organization in support of its mission and work.
Furthermore, we understand that our customers are looking for unique and customizable options. That's why we offer the largest selection of ties and accessories in the U.S., including options for men, women, and children. Whether you're preparing for a formal event, seeking a custom look for your organization, or simply looking to add a touch of elegance to your everyday attire, Beau Ties offers an unparalleled range of products to meet every need.
Lastly, our commitment to customer satisfaction is illustrated by our made-to-order approach and our generous 60-day return policy for standard items. We understand that your bow tie is not just an accessory but an expression of your personal style and individuality.
To complete your look with refined style, don’t forget to pair your bow tie with a sharp pair of men's dress socks that complement your outfit and add a subtle touch of personality.